- makeITcircular 2024 content launched – Part of Maker Faire Rome 2024Posted 1 month ago
- Application For Maker Faire Rome 2024: Deadline June 20thPosted 3 months ago
- Building a 3D Digital Clock with ArduinoPosted 8 months ago
- Creating a controller for Minecraft with realistic body movements using ArduinoPosted 8 months ago
- Snowflake with ArduinoPosted 9 months ago
- Holographic Christmas TreePosted 9 months ago
- Segstick: Build Your Own Self-Balancing Vehicle in Just 2 Days with ArduinoPosted 9 months ago
- ZSWatch: An Open-Source Smartwatch Project Based on the Zephyr Operating SystemPosted 10 months ago
- What is IoT and which devices to usePosted 10 months ago
- Maker Faire Rome Unveils Thrilling “Padel Smash Future” Pavilion for Sports EnthusiastsPosted 11 months ago
DIY Laser-Spiked Jacket, Ready to Dance!
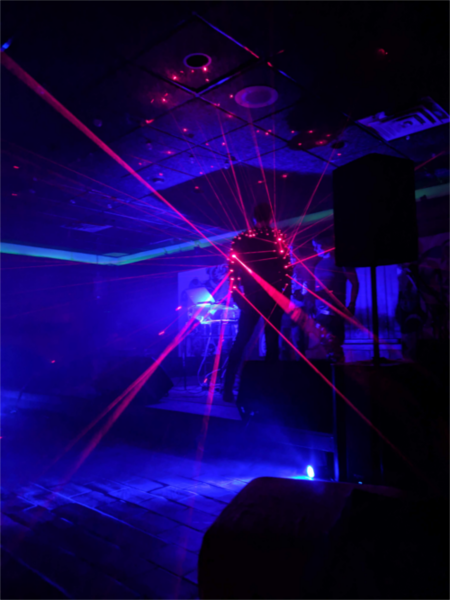
Inspired by Yoshii Kazuya’s laser-spiked outfit, github user abetusk decided to create an excellent version of the getup by embedding 128 laser diodes in his own jacket.
These lasers are powered by an Arduino Nano, along with a pair of I2C PWM output boards, allowing them to be switched in sets of four. The lasers can be controlled either by joystick, via a microphone in order to react to sound, or in a looping ‘twinkle’ pattern.
“The basic design is to attach 128 laser diodes to the arms, shoulders and upper back of a ‘moto’ jacket and provide power and control to the laser diodes with electronics. The electronics are put into a housing and all wires, electronics and their housing are hidden in the interface between the outer jacket shell and the inner lining.
A joystick and microphone are used for input. Power is provided by a LiPo rechargeable battery.
The basic components are:
- Laser diode housing and attachment
- Electronics
- Electronics Housing
- Wiring and connection
The basic workflow is roughly as follows:
-
Assemble the laser diodes with their connectors and housing
-
Attach the laser diodes to the jacket
-
Solder the electronics and assemble them in their housing
-
Create the cabling and connect the laser diodes to the electronics
-
Wear it”
Assuming the availability of soldering iron, multimeter, wire strippers, laser cutter and many other basic parts, the estimated cost of the project is about $300 in raw materials and about 20 hours worth of labor.
Watch the demonstrative video below or jump on Github for Arduino code and other files needed to build your own.

Related Posts


-
 Arduino ISP (In System Programming) and stand-alone circuits
We use an Arduino to program other ATmega without...
- Posted 12 years ago
-

-

-
 GSM GPS shield for Arduino
Shield for Arduino designed and based on the module...
- Posted 12 years ago
-
 Small Breakout for SIM900 GSM Module
Some post ago we presented a PCB to mount...
- Posted 13 years ago
-
 makeITcircular 2024 content launched – Part of Maker Faire Rome 2024
Applications to MakeITcircular must be in by October 3,...
- Posted 1 month ago
-
 SONY color camera module, 700 TV Lines
Color camera module equipped with a 1/3″ CCD sensor...
- Posted 2 months ago
-
 ESP32 Low Power Module
ESP32 Low Power Module, based on Espressif’s SoC capable...
- Posted 3 months ago
-

-
 Application For Maker Faire Rome 2024: Deadline June 20th
Learn More About the Ideas, Makers + Projects at...
- Posted 3 months ago